Human anatomy shooting targets exist because the body is not a silhouette. A B-27 zone is a contour drawn on paper. The cardiac box, the cranial T-box, and the pelvic girdle are three-dimensional anatomical structures with specific dimensions, specific locations, and specific failure modes when struck. Training shot placement against the latter — not the former — is the difference between a hit that scores and a hit that ends the engagement.
That distinction is the entire reason photorealistic anatomy targets exist as a training category. They show the shooter where the structures that matter actually sit inside the body, at the angles the body actually presents in a real encounter. The training shifts from "hit center mass" to "hit the specific anatomy that fails when struck." Every higher-level scenario training rests on that foundation.

The three vital zones every anatomy target should show
Three anatomical zones dominate defensive shooting curriculum, and any serious anatomical target shows them with realistic placement and proportion.
The cardiac box
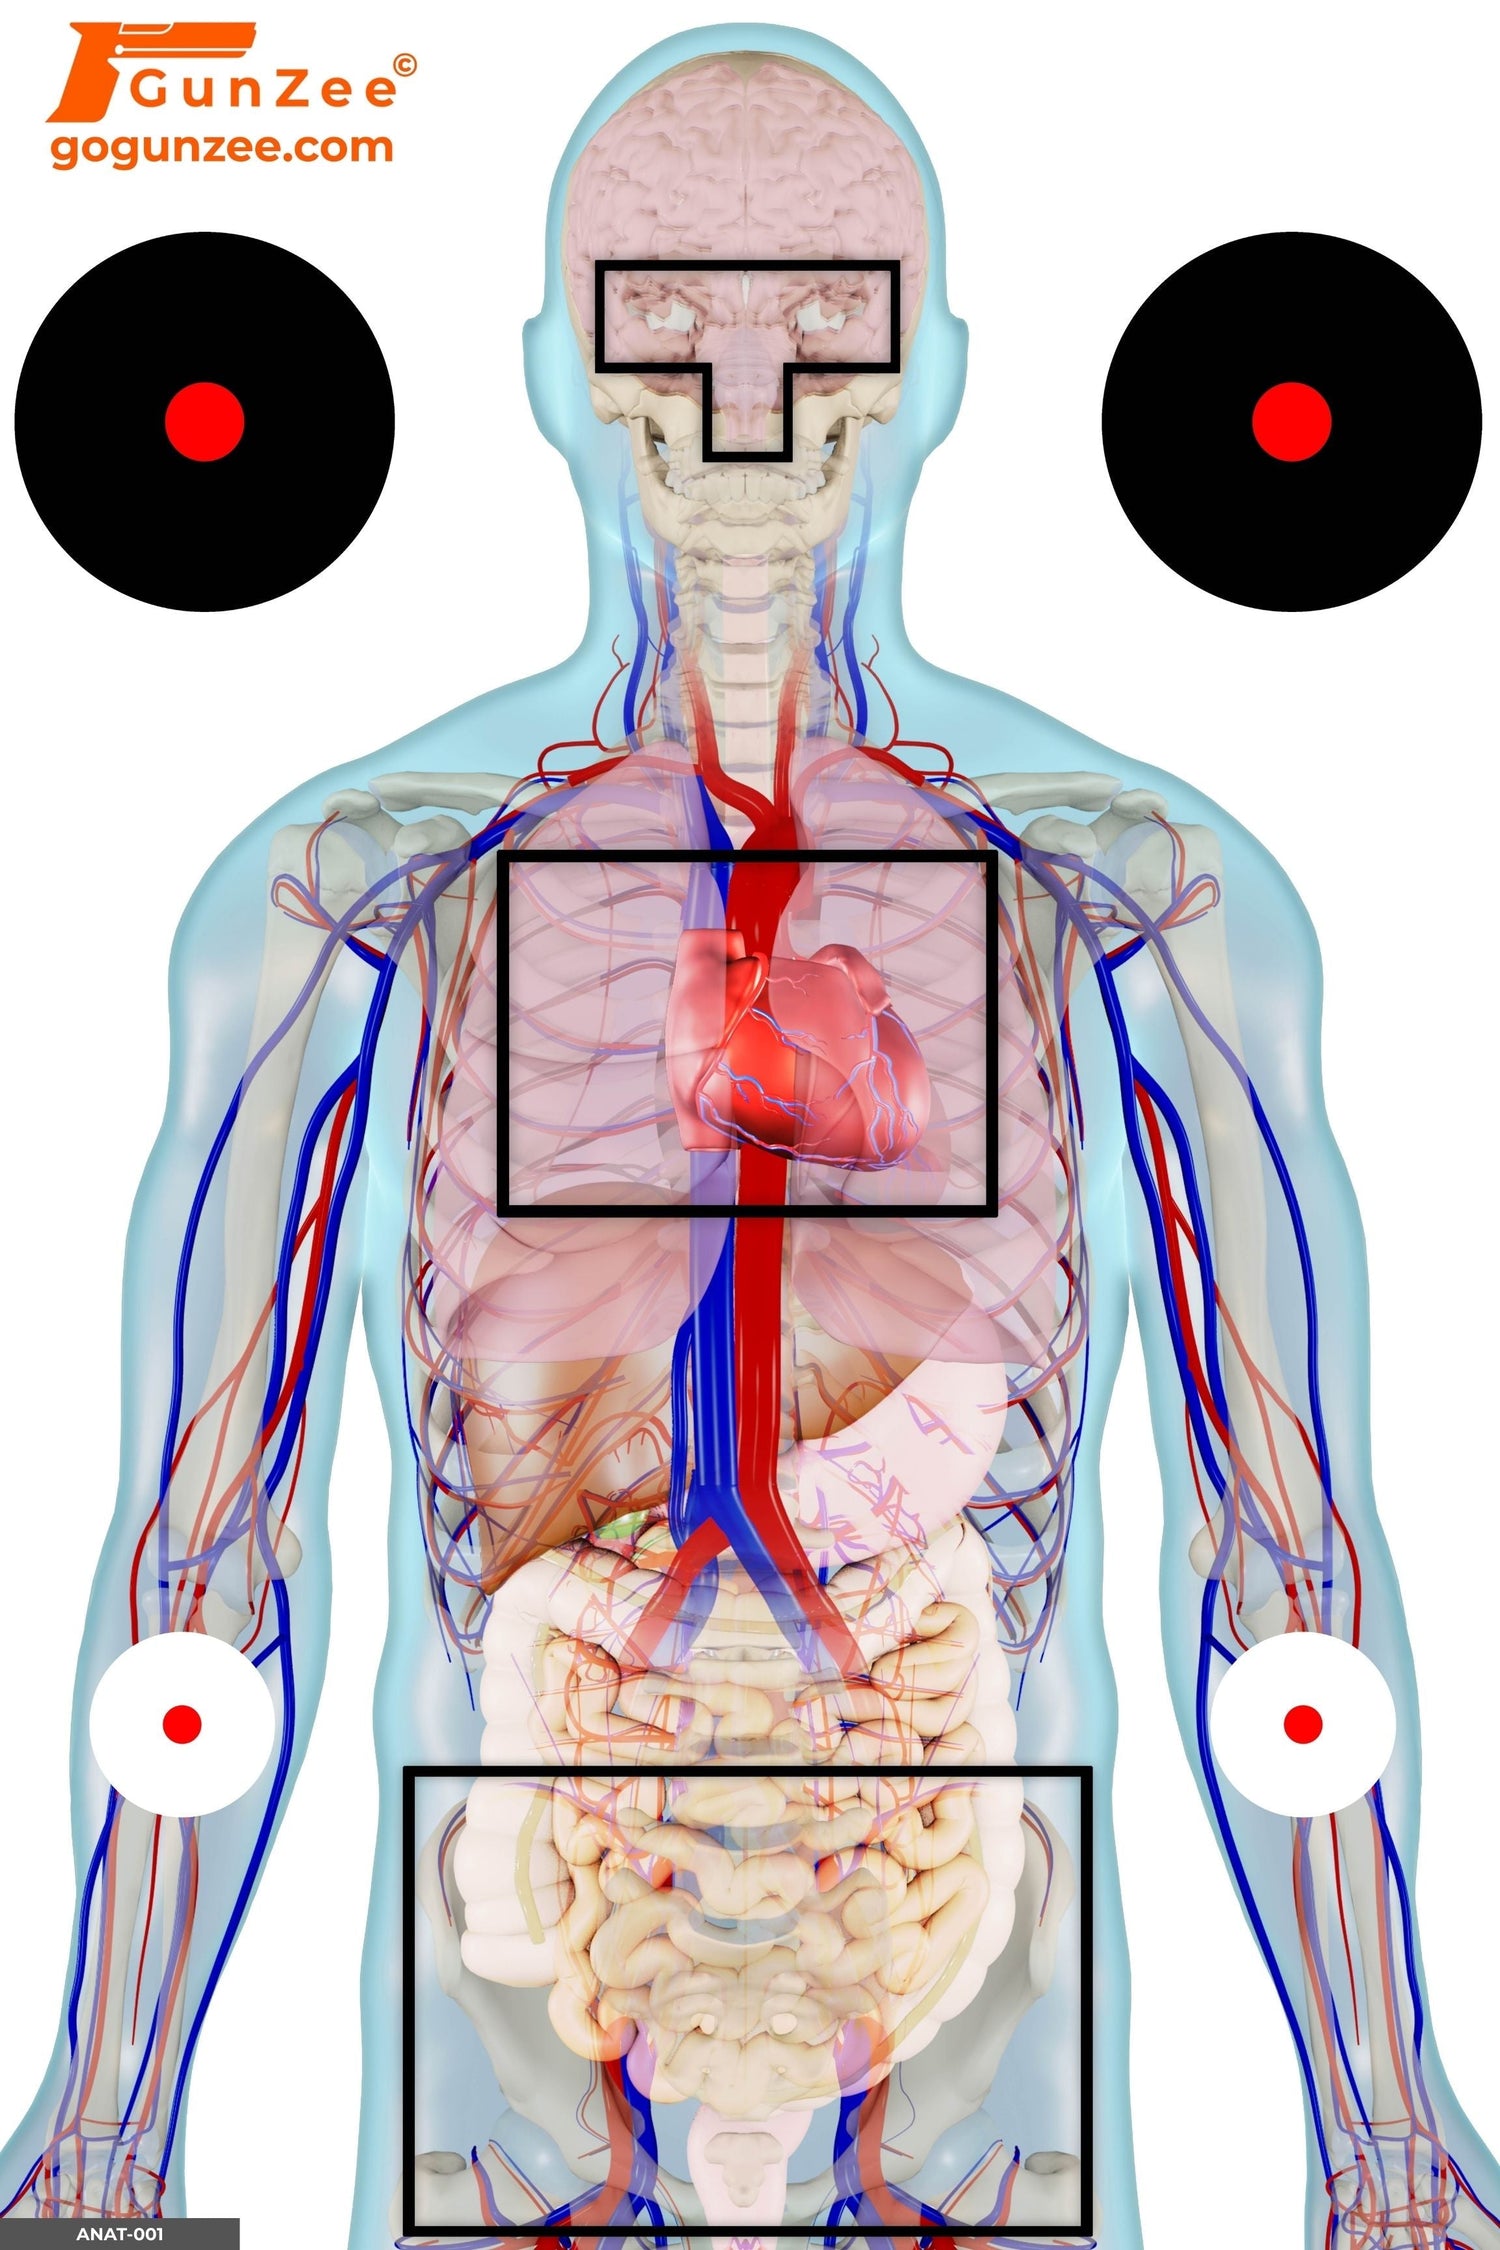
The four-by-four-inch area centered roughly between the nipples, covering the heart, the great vessels of the upper thorax, and the upper lobes of the lungs. A hit here causes rapid blood-pressure collapse and ends most fights in seconds. It is the highest-probability stop zone for handgun rounds — but its size and exact location are specific, not approximate. "Center mass" is the conversational version of cardiac box; on an anatomy target, the box is drawn precisely so the shooter trains a point instead of a region.
The cranial T-box
The T-shaped zone formed by the horizontal line across the eyebrows and the vertical line down the bridge of the nose to the upper lip. A hit anywhere inside this T reaches the brainstem and produces an instantaneous stop with no muscular response from the threat. This is the textbook hostage-rescue shot — the answer when the cardiac box is occluded by a hostage's body — and the reason precision matters at distances most shooters never train.
The pelvic girdle
Often skipped by shooters who train only on chest-centered silhouettes. A round to the pelvic structure does not end consciousness, but it removes the threat's ability to stand, advance, or close distance. This matters when the threat is moving toward the shooter or wearing body armor that defeats torso shots. Anatomy targets show the bony structure and the gap between iliac crests so the shooter places a deliberate shot rather than aiming low and hoping.
The 8 anatomy targets in the GunZee line — and what each one trains
The full anatomical library covers the major engagement geometries a defensive shooter encounters. Each target shows the same three vital zones, drawn correctly for a different angle and threat type.
1. Anatomical Full-System Vital Zone
The Anatomical Full-System Vital Zone target shows the cardiac box, cranial T-box, and pelvic girdle on a face-on threat in one frame. This is the foundational reference target. Every other anatomical target builds on the placement calibration this one establishes. A CCW holder buying a single anatomy target should buy this one.
2. Anatomical Hostage Shield
The Anatomical Hostage Shield target shows the threat positioned behind a smaller non-threat figure. The cardiac box is occluded; the cranial T-box is exposed above the hostage's head. This is the textbook hostage-rescue geometry — the moment the T-box shot becomes the only ethical shot — and it's where cranial T-box precision actually gets built under conditions that mirror reality.

3. Anatomical Head-Out Vehicle Window Engagement
The Anatomical Head-Out Vehicle Window target shows the threat presenting only a head and shoulders through a vehicle window frame — exactly the geometry of a carjacking, a road-rage escalation, or a traffic-stop confrontation. Only the cranial T-box and a partial cardiac box are visible. The shooter trains for a precision shot under high time pressure with a constrained presentation angle.
4. Anatomical Rifle Threat Vital Zone
The Anatomical Rifle Threat target shows the threat at the distance and silhouette of a long-gun engagement. Rifle anatomy is the same anatomy — but terminal performance differs and the threat presentation is different. Active-shooter response, home defense with a long gun, and any patrol-rifle engagement scenario benefits from this target.
5. Anatomical Side-Profile Rifle Threat
The Anatomical Side-Profile Rifle Threat target covers the same engagement at a three-quarter side angle. Cardiac box geometry changes substantially from this presentation. A round that "centers mass" on a face-on rifle threat will often miss the cardiac box at side profile — this target exposes that.
6. Anatomical Frontal Handgun Threat
The Anatomical Frontal Handgun Threat target shows the threat at handgun-engagement distance presenting a face-on chest and a clear cranial T-box. This is the top-selling target in the GunZee line and the workhorse of anatomical training — the target that most shooters keep returning to once they've worked through the full-system reference target.

7. Anatomical Semi-Frontal Handgun Threat Precision
The Anatomical Semi-Frontal Precision target shows the threat at a slight three-quarter angle — the angle most threats actually present in a real engagement, because few subjects squarely face the shooter before reacting. Cardiac box from this angle is narrower and offset; precision demands climb.
8. Anatomical Semi-Profile Handgun Threat
The Anatomical Semi-Profile target takes the angle further toward profile, where the cardiac box compresses into a thin vertical column and the cranial T-box becomes the more reliable shot. Training this geometry builds the shooter's ability to read the angle in real time and adjust placement on demand.
How to use the 8 targets in a training cycle
The targets work as a progression, not a checklist. A practical sequence:
- Establish placement on the full-system reference at 7 and 10 yards until cardiac box hits are reliable.
- Add cranial T-box precision on the same target at the same distances. Expect a measurable accuracy drop. This is the gap anatomy training surfaces.
- Move to the frontal handgun threat — same anatomy, threat-presentation context. Track whether cardiac box hit rate degrades when the threat is presented as a threat rather than a reference.
- Add the semi-frontal and semi-profile angles. These reveal where the shooter's mental model of "center mass" diverges from the actual cardiac box.
- Introduce the hostage shield only after the T-box hit rate on the full-system target is consistent. T-box precision under hostage geometry without prior T-box discipline produces wishful thinking and dangerous shots.
- Cover specialty geometries — vehicle window, rifle threat, side-profile rifle — as the engagement contexts that match your realistic risk profile.
The progression is the point. Buying all eight targets and rotating them randomly is a less efficient training cycle than working the foundational target until it stabilizes, then layering complexity. For repetition volume at scale, the 50 Best Sellers training pack includes the most-used anatomical and scenario targets in one curated bundle.
Where anatomy fits in the broader training stack
Anatomy targets sit between marksmanship and scenario decision-making. They are the bridge that turns the mechanical fundamentals — grip, stance, sight alignment, trigger control — into the precise placement that real engagements require. They are not a replacement for scenario training; they are the placement layer that scenario training assumes.
For the full case on why anatomical placement beats silhouette training for defensive shooters, see the pillar article Anatomical Targets vs. Bullseye: Why Shot Placement Saves Lives. For how anatomy folds into hostage-proximity decision drills, see Hostage Scenarios: The Decision-Making Drills Most Shooters Skip.
The full anatomical library lives in the Anatomical Shooting Targets collection.
→ BROWSE THE ANATOMICAL SHOOTING TARGETS COLLECTION
Frequently asked questions
What is a human anatomy shooting target?
A human anatomy shooting target is a photorealistic paper target that shows the actual vital structures inside the human body — cardiac box, cranial T-box, and pelvic girdle — at the orientation the threat presents. The shooter trains shot placement against real anatomy rather than against abstract geometric scoring zones.
How are anatomy targets different from silhouette targets?
A silhouette scores any hit inside a zone. An anatomy target shows the specific structures that fail when struck — and they are smaller and more specifically placed than silhouette zones. Anatomical training exposes the gap between drill marksmanship and the precision real engagements require.
Which anatomy target should a CCW holder buy first?
The Anatomical Full-System Vital Zone target is the foundational reference target. It shows cardiac box, cranial T-box, and pelvic girdle on a face-on threat in one frame, which lets the shooter calibrate placement against all three primary zones at the same range session.
Do you need both frontal and profile anatomy targets?
Yes. Real threats rarely present face-on. The cardiac box from a three-quarter angle is geometrically different from the face-on cardiac box, and the shot placement that hits one will miss the other. Training the angles the threat actually presents is the point.
Are anatomical targets useful for rifle shooters?
The anatomy is identical between rifle and handgun engagements. The threat presentation differs — rifle threats engage at distance with a long gun visible, handgun threats are typically closer. Both Anatomical Rifle Threat and Anatomical Frontal Handgun Threat targets exist so each shooter trains the engagement geometry that matches their weapon.
Can anatomy targets be used for hostage-rescue practice?
Yes. The Anatomical Hostage Shield target shows the threat positioned behind a non-threat figure, with the cranial T-box exposed and the cardiac box occluded. That's the textbook hostage-rescue geometry and it's where T-box precision gets built.

