A bullseye target gives a score for any hit inside the ring. A human threat does not. The center of a B-27 silhouette is not the center of a stop. The X-ring is not a cardiac box. The 10-zone is not the cranial T-box. These distinctions — geometric zone vs. real anatomical structure — are the difference between a hit that scores and a hit that ends the engagement, and they cannot be trained on geometric targets.
Anatomical shooting targets exist for exactly this reason. They show the shooter where the structures that matter — the cardiac box, the cranial T-box, the pelvic girdle — actually sit inside the body, at the angles the body actually presents. The training shifts from "hit center mass" to "hit the specific anatomy that fails when struck." That is the foundation that every higher-level scenario training rests on.

What the anatomy actually shows
The body is not a target. It is a structure that fails at specific points when specific things happen to it. Three of those points dominate the discussion in defensive shooting curriculum.
The cardiac box
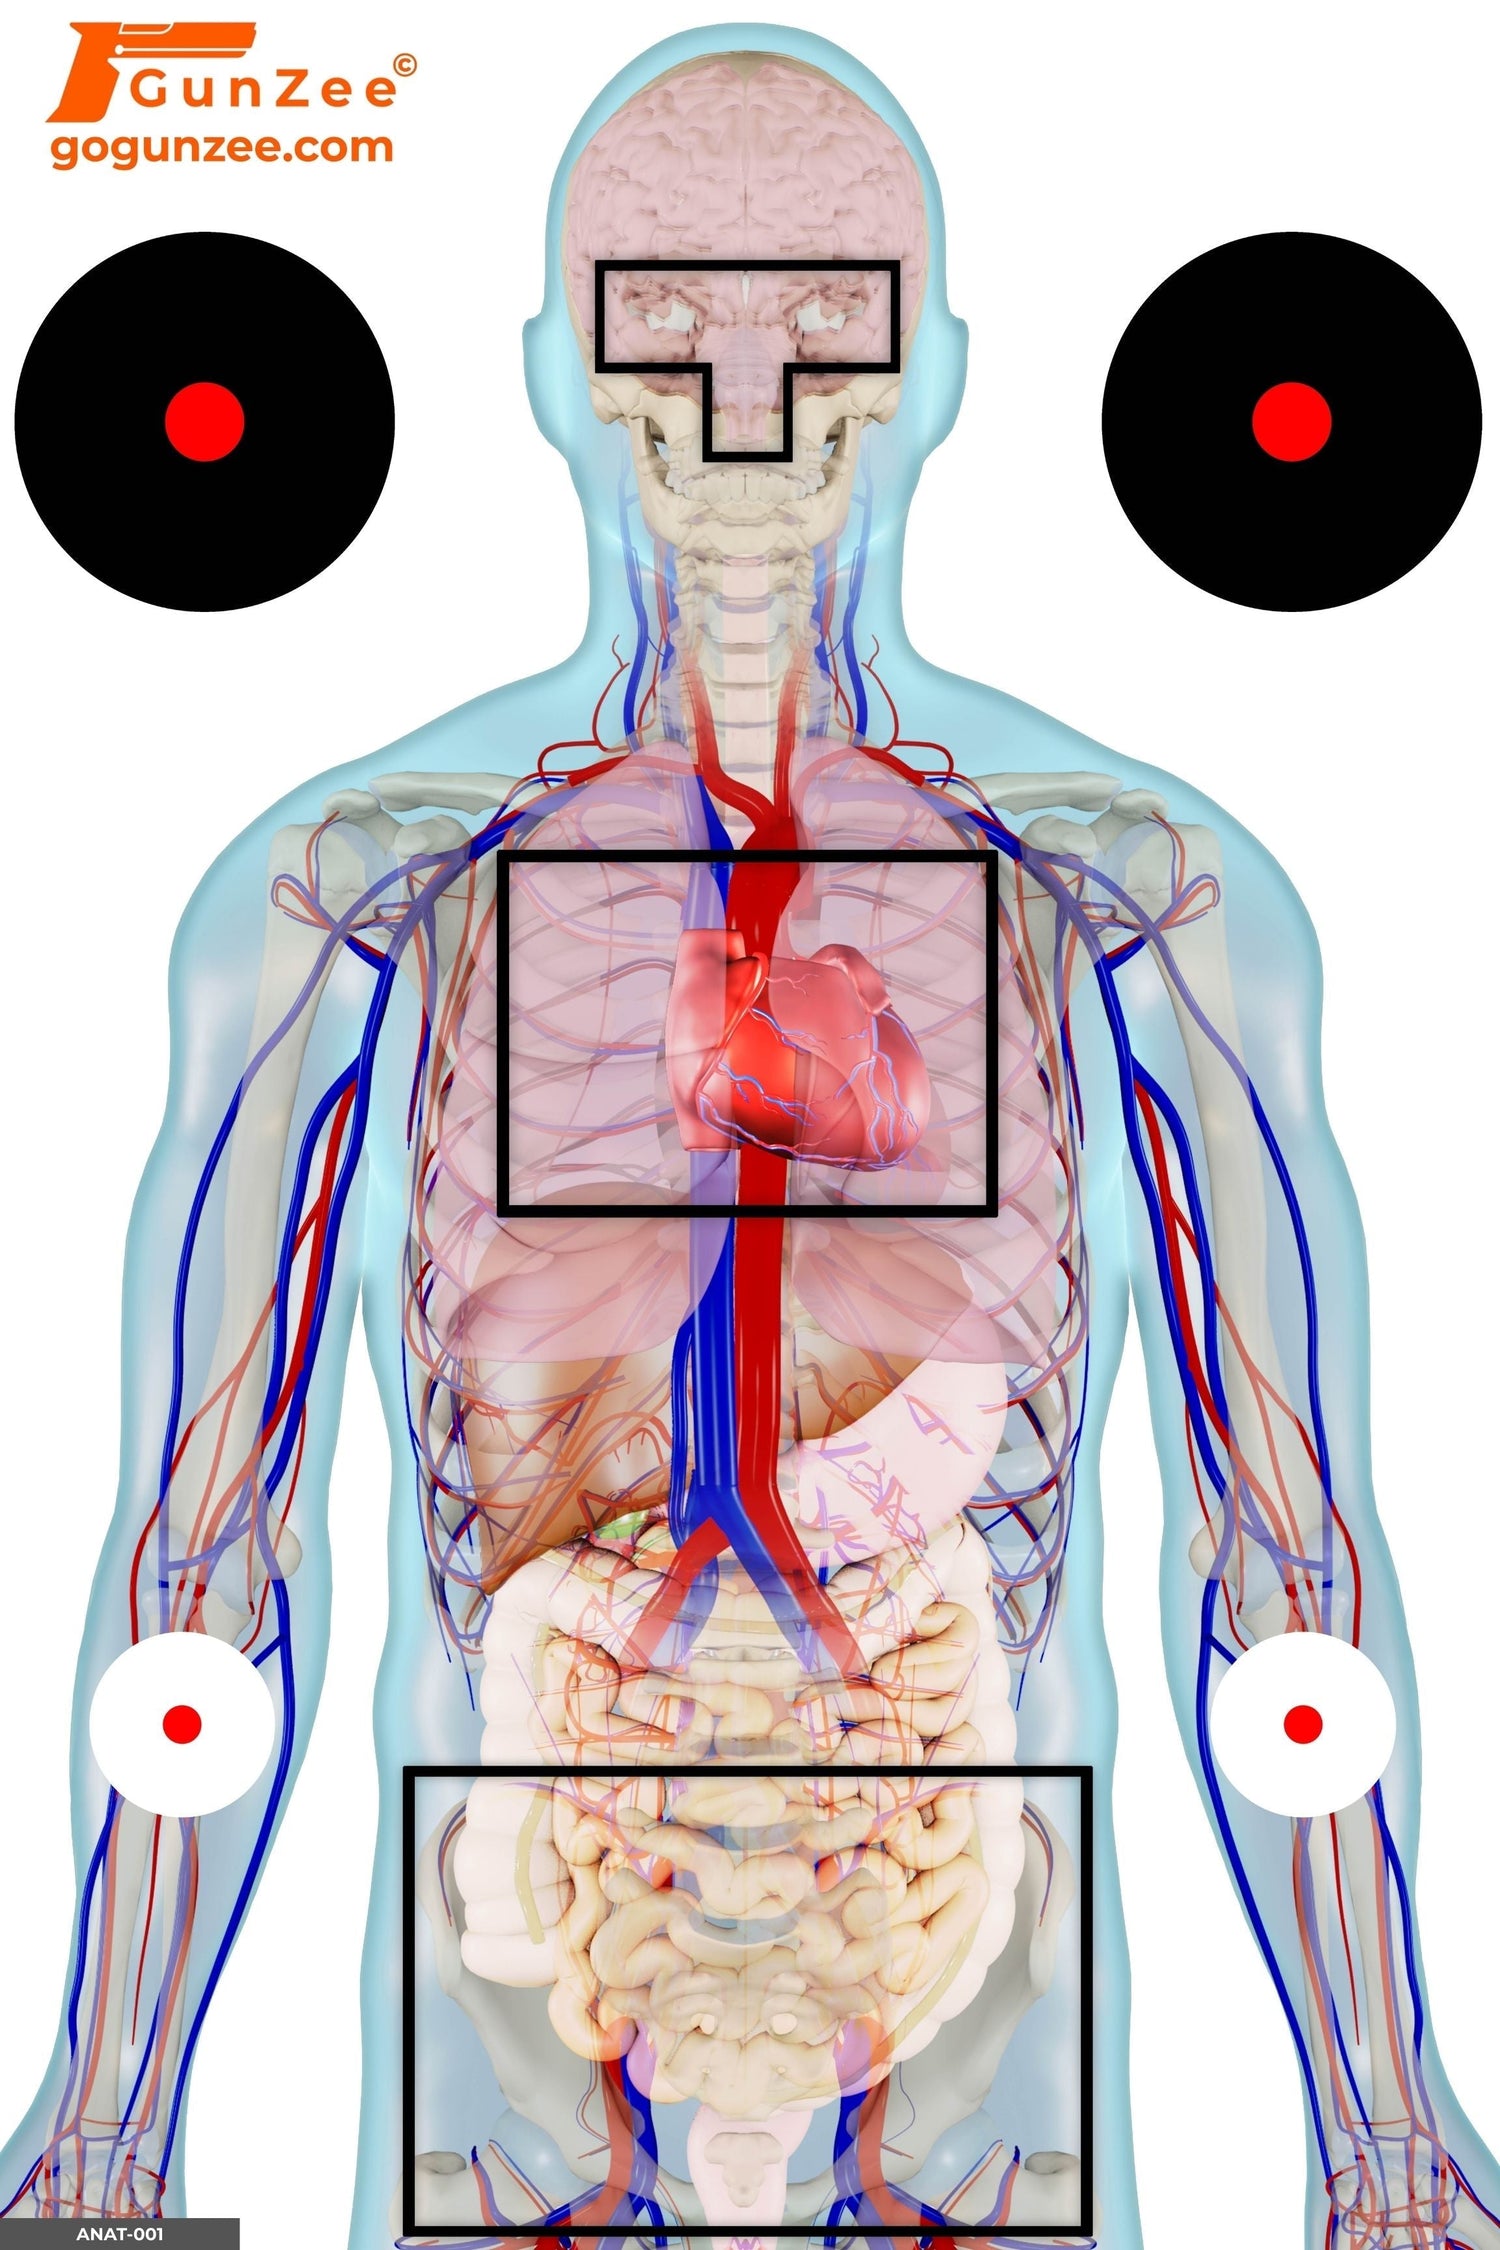
The four-by-four-inch area centered roughly between the nipples, encompassing the heart, the great vessels of the upper thorax, and the upper lobes of the lungs. A hit here causes rapid blood-pressure collapse and ends most fights in seconds rather than minutes. It is the highest-probability stop zone for handgun rounds and the reason "center mass" exists as a concept — but "center mass" is approximate. The cardiac box is precise. An anatomical full-system vital zone target shows the exact dimensions and orientation so the shooter trains a specific point, not a region.
The cranial T-box
The cranial T — formed by the horizontal line across the eyebrows and the vertical line down the bridge of the nose to the upper lip. A hit anywhere inside this T-shaped zone on the face reaches the brainstem and the central nervous system, producing an instantaneous stop with no muscular response from the threat. This is the textbook hostage-rescue shot, the answer when the cardiac box is occluded by a hostage's body, and the reason precision matters at distances most shooters never train. An anatomical frontal handgun threat target shows the cranial T-box overlaid on a realistic facial structure.

The pelvic girdle
The third zone, often dismissed by shooters who train only on chest-centered silhouettes. A round to the pelvic structure does not end consciousness, but it removes the threat's ability to stand, advance, or close distance. This matters most when the threat is moving toward the shooter or wearing body armor that defeats torso shots. Anatomical targets show the bony structure and the gap between iliac crests so the shooter trains a deliberate placement rather than aiming low and hoping.
Why geometric targets fail at this
A bullseye scores a hit by distance from center. A B-27 scores a hit by zone. Neither one represents the actual probability that a specific shot ends a specific fight. Train enough bullseye and the shooter learns to put rounds in a tight group around a point — but the point is arbitrary, and the group is shaped by paper, not by anatomy.
Three concrete failure modes:
Angle blindness. A bullseye does not change shape when the target rotates. A human chest at three-quarter profile presents a different cardiac box than one facing forward. An anatomical semi-profile threat target shows the cardiac box from the angle the threat actually presents, which is rarely face-on. The shot that "centers mass" on a bullseye misses the cardiac box on a three-quarter angle.
Backstop ignorance. A bullseye has no neck, no shoulders, no hostage in front of it. The shooter never considers what's behind the round because the target never models a backstop. Anatomical targets that include hostage geometry — like the anatomical hostage shield target — make the consequence of an off-axis round visible immediately.
Distance miscalibration. Bullseye accuracy degrades at distance and the shooter knows it. Anatomical accuracy degrades at distance faster than the shooter expects, because the viable hit zones are smaller in the body than in the target's printed ring. Train on anatomical paper and the distance threshold for a reliable cardiac shot reveals itself.

Rifle versus handgun anatomy
The anatomy doesn't change. The terminal performance does. A handgun round that lands in the cardiac box stops the fight by exsanguination — minutes, in rare cases seconds. A rifle round in the same zone delivers fragmentation and temporary cavitation that often ends the fight immediately. Training the same exact anatomical placement applies to both, but the shooter should understand which weapon they're training and what the realistic stop time is for that weapon at that placement.
An anatomical rifle threat target shows the threat in a long-gun engagement context — common in home-defense and active-shooter response — and trains the placement precision rifle accuracy makes possible. An anatomical side-profile rifle threat target covers the same placement at a three-quarter angle.
Where anatomical training fits in a CCW training cycle
Anatomical targets sit between marksmanship and scenario training. They are the bridge.
The progression that builds competent decision-makers under stress runs:
- Bullseye / B-27 silhouettes for grip, stance, sight alignment, trigger control — the mechanical fundamentals.
- Anatomical vital-zone targets for shot placement against actual human structure. This is where most CCW holders should be spending the largest share of training time.
- Single-actor scenario targets for threat confirmation and basic decision-making under one variable.
- Multi-actor and hostage scenarios for prioritization, sequencing, and restraint under multiple variables.
- Force-on-force or simulator work for the final integration with live stress.
Most shooters skip directly from step 1 to step 3 (or step 4) without spending real reps at step 2. The cost is real. Scenario targets without anatomical placement training produce hits that score in a drill and miss in reality.
Where to start
For a CCW holder who has never trained on anatomical targets, three targets cover the major engagement geometries:
- The anatomical full-system vital zone target for face-on engagement and reference geometry — the foundational target every kit should have.
- The anatomical semi-profile target for the angle the threat actually presents in real engagements.
- The anatomical hostage shield target for backstop awareness and the geometry of a complicated shot.
The full anatomical library — eight purpose-built targets covering frontal, semi-frontal, profile, semi-profile, rifle, hostage-shield, and vehicle-window geometries — lives in the Anatomical Shooting Targets collection.
→ BROWSE THE ANATOMICAL SHOOTING TARGETS COLLECTION
Frequently asked questions
What is an anatomical shooting target?
An anatomical shooting target is a photorealistic target that shows the actual anatomical structures inside the human body — cardiac box, cranial T-box, pelvic girdle — at the orientation the target presents. The shooter trains placement against real anatomy rather than against a geometric scoring zone.
Why train anatomy instead of just center mass?
"Center mass" is an approximation. The cardiac box is a specific four-by-four-inch area, not the center of a silhouette. The cranial T-box is the T-shaped zone across the eyebrows and down the bridge of the nose — a precise facial structure, not a general head shot. Training the specific anatomy produces stopping shots; training "center mass" produces hits that score but may not stop the threat.
Are anatomical targets harder than bullseye targets?
The viable hit zones are typically smaller than bullseye scoring rings, so accuracy demands are higher. That difficulty is the point — it exposes the gap between drill marksmanship and defensive marksmanship that bullseye training hides.
At what skill level should anatomical training start?
After basic marksmanship is established — reliable groups inside two inches at seven yards. Below that, the shooter is still building the mechanical foundation and adding anatomy on top creates frustration without learning. Once groups stabilize, anatomical placement is the next step.
What's the difference between anatomical targets and scenario targets?
Anatomical targets train placement against real anatomy with the threat shown in isolation. Scenario targets train decision-making against a threat shown in context — bedroom doorway, bank lobby, hostage geometry. Anatomical is the placement layer; scenario is the decision layer. Most CCW holders need both.
Should rifle shooters and handgun shooters use different anatomical targets?
The anatomy is the same. The threat presentation is different — handgun threats are typically closer and more concealed; rifle threats engage at distance with the long gun visible. The anatomical rifle threat target shows a long-gun engagement context; anatomical handgun targets show handgun threats. Train both for the engagements that match real-world risk profile.
How does anatomical training prepare for hostage-rescue scenarios?
The cranial T-box shot is the textbook answer when the cardiac box is occluded by a hostage. Anatomical training is where cranial T-box precision gets built. Without it, hostage scenarios become wishful thinking instead of repeatable skill.

